 Enzo O'Hara Garza
1 min read
Unlocking the Power of Xero Accounting Software
For small businesses, accounting software is a must-have for managing financial data efficiently. In this blog post, we will delve into the details...
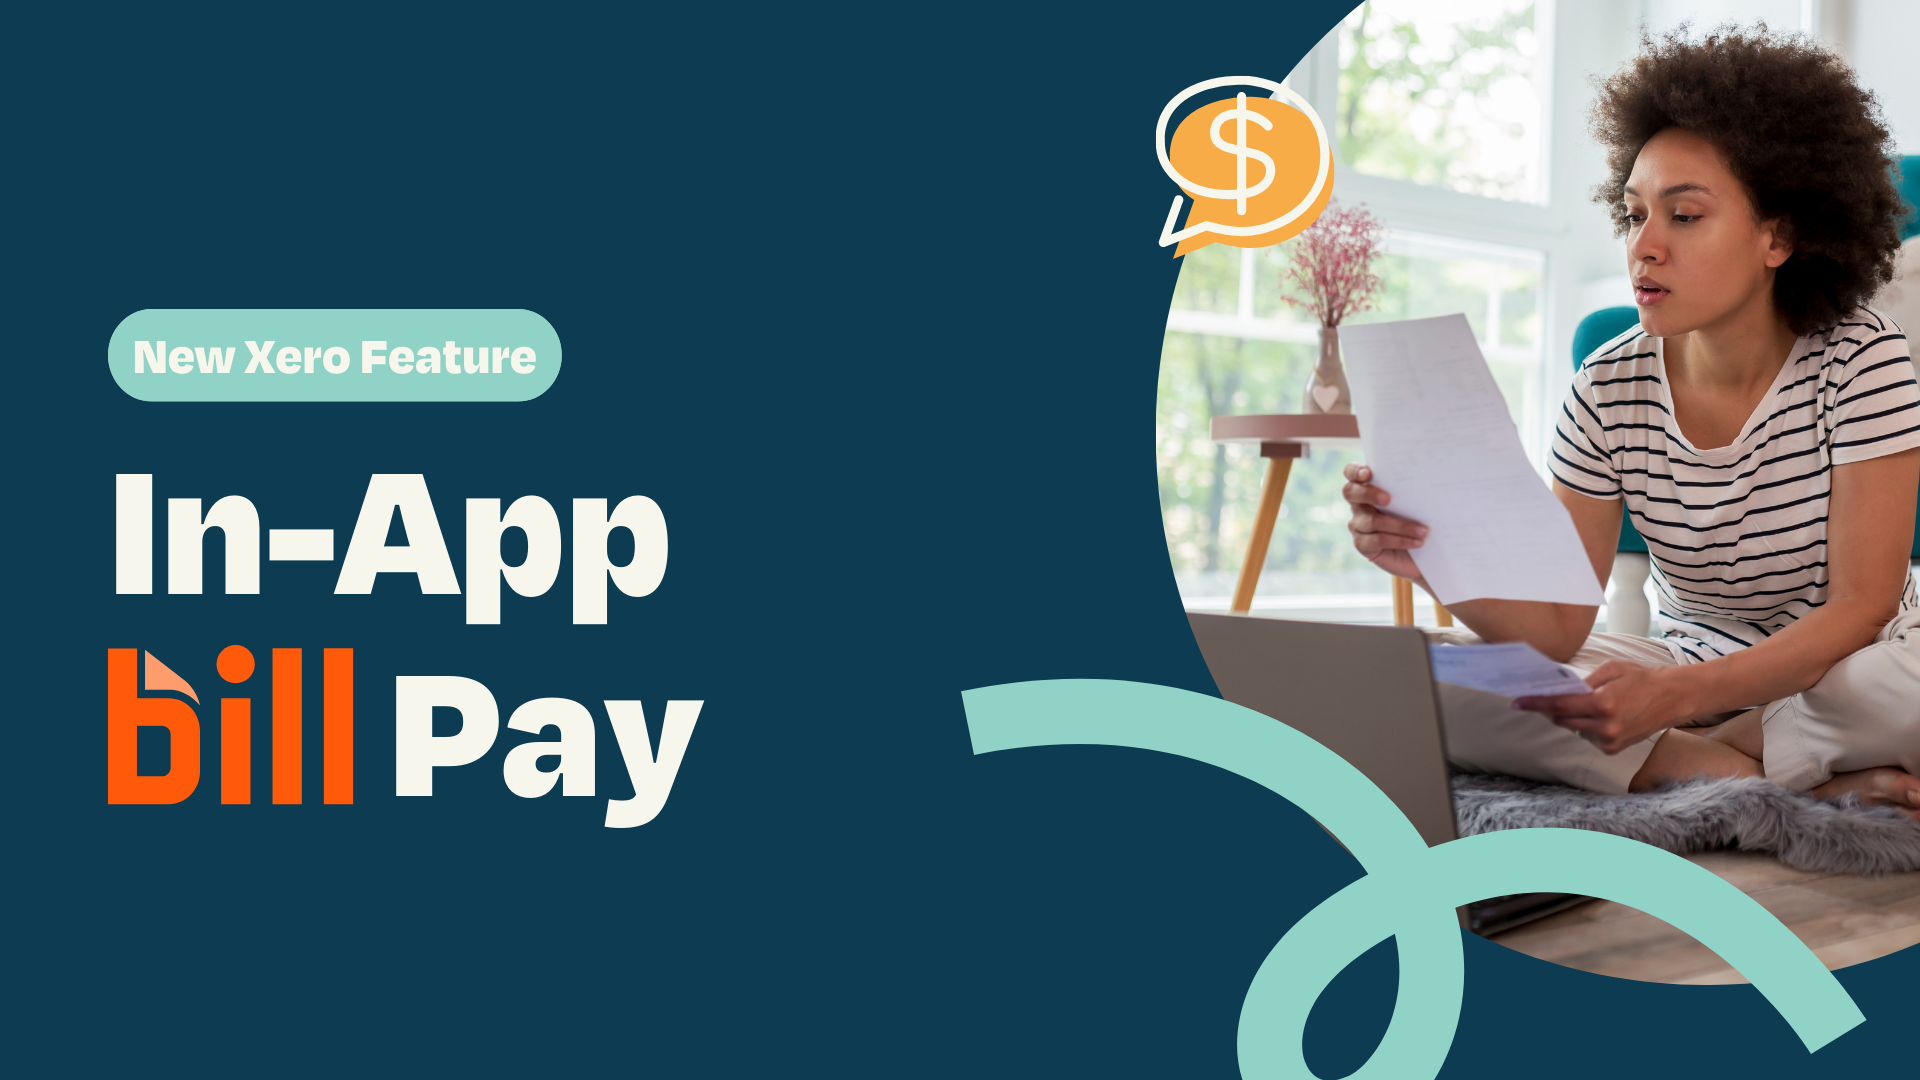
Managing bills and payments is a critical (and often tedious) task for any small business. Xero’s latest in-app bill pay integration, powered by BILL, aims to simplify this process by letting you pay your vendor bills directly within Xero. In this article, we’ll explain what this integration is, why it’s a big deal for small businesses, and how to make the most of it.
We’ll cover the core features and benefits, how it streamlines your accounts payable workflow, steps to set it up (including verifying your business with BILL), key limitations to note, available payment options, security measures, pricing and fees (including a 30-day free promotion), access to BILL’s vast vendor network, and real-world examples of how businesses are using this feature. We’ll also share a testimonial from an early adopter and provide links to official Xero and BILL resources for further help. Let’s dive in!
|
Table of Contents |
|
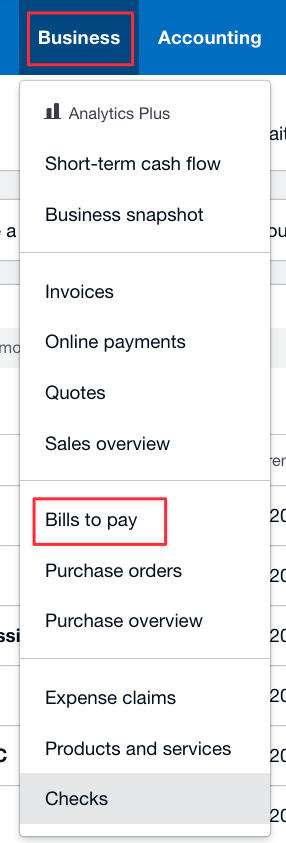
How The new BILL Integration Streamlines Your Accounts Payable Workflow |
Xero’s in-app bill pay integration with BILL is a new feature (currently for Xero’s U.S. customers) that allows you to pay supplier bills directly from within Xero’s accounting platform. It is built through a partnership with BILL (formerly known as Bill.com), a leading financial operations platform. In simple terms, Xero has embedded BILL’s bill payment capabilities into the Xero interface. This means when you have bills entered in Xero, you can now also process payments for those bills without ever leaving Xero.
This matters because it addresses a common pain point for small businesses: juggling multiple apps or manual processes to pay bills. Traditionally, you might review bills in Xero, then log into your bank or a separate bill payment app to actually pay those bills, then come back to Xero to reconcile and record the payment. That process is time-consuming and error-prone. According to Xero’s research, over half of U.S. small businesses spend more than 4 hours per month managing accounts payable (bill payments). Many businesses struggle with things like keeping track of due dates and dealing with cash flow visibility. By bringing bill payment directly into Xero, those tasks become much easier. You’ll have one place to handle everything – from receiving a bill to paying it and seeing it marked as paid in your books – which saves time and reduces mistakes.
The Xero–BILL integration is a game-changer for small business owners who want to streamline how they pay bills. It turns a previously clunky multi-step process into a seamless part of your regular bookkeeping routine. Cash flow management becomes more intuitive because you can see what’s due and pay it all in one system, with no double data entry. For a small business without an accounting background, it means less hassle, fewer applications to manage, and more peace of mind that bills are paid on time.
The Xero–BILL bill pay integration comes with a host of features designed to make bill paying easier and more efficient. Here are the core features and the benefits they bring to your business:
You can select and pay several bills in one go with just a few clicks, without leaving Xero. This batch payment capability saves time, especially if you have many invoices to pay. Instead of processing each bill one by one, you handle them together and reduce repetitive work.
Because the solution is embedded, there’s no need to switch between Xero and other banking or payment apps. Once a bill is in Xero, you can pay it right there. The bill is then automatically marked as paid and the payment is recorded in Xero for you, providing instant reconciliation of your accounting records. This eliminates manual data entry and potential errors from syncing data between different systems.
By using BILL’s infrastructure, Xero gives you access to BILL’s proprietary network of over 7.1 million members (vendors). In practice, this means it’s easier to find your vendors and pay them electronically. If your supplier is already in the BILL network, their payment details might be readily available, making the payment process quicker. You can invite vendors to join the network or connect with those already there, simplifying the setup for electronic payments.
The integration supports multiple ways to pay your vendors (more details in the Payment Options section below). For example, you can pay via bank transfer (ACH) and if your vendor prefers, they can receive money as a direct deposit to their bank account. If you only have a mailing address for a vendor, BILL will automatically mail them a check. Vendors in the BILL network can also choose more advanced digital payment methods (such as an electronic ACH transfer, an online bill payment service, a virtual card payment, or even a digital wallet), and Xero’s interface will simply show that as an electronic payment to you. This flexibility means vendors get to choose how they want to be paid and you don’t have to manage those preferences – the system handles it.
After you initiate payments, you can track the status of all bill payments within Xero. You’ll see which bills have been paid and when, without needing to log into your bank or a separate payment portal. This gives you up-to-date insight into your outgoing cash flow. For instance, you can easily confirm a payment has been delivered to a vendor, or see if something is still processing.
When it’s time to actually send payments, the integration uses two-step verification to protect you. Two-step verification means you’ll need to confirm the payment with a second factor (for example, entering a code from your phone) to ensure that the person initiating the payment is authorized. This extra layer of security helps prevent fraud and unauthorized transactions. Small businesses can be frequent targets of payment fraud, so having built-in two-factor authentication adds peace of mind that your money is safe.
Xero’s bill payments allow for an approval process. Your team members (or an outside accountant/bookkeeper) can prepare bills for payment, and then you (or whoever is the authorized person) can review and authorize those payments before they’re sent. In practice, this might look like an office manager scheduling the bills in Xero and using a “Request someone to pay” feature, which then notifies the business owner to log in and approve the batch. This way, you maintain control over cash going out, while still delegating the busywork of data entry.
Once a bill is paid through this system, Xero will automatically mark the bill as paid and, in many cases, reconcile the payment with your bank feed in Xero. The benefit is that your accounting records are updated without you doing anything extra. Your books stay accurate and up-to-date without manual matching of payments to bills. This reduces errors (no more forgetting to reconcile a payment or accidentally duplicating a payment record).
Importantly, this is a feature included with Xero (for U.S. business edition subscribers) without any additional monthly cost. You don’t have to pay for a separate Bill.com subscription to use it – you simply pay per transaction when you actually make a bill payment through BILL in Xero. (We’ll detail the transaction fees later, but there’s also a free trial period for the first 30 days.) Having no added software subscription fee makes this integration very accessible for small businesses watching their expenses.
Does this mean that folks who have an active BILL account can cancel their account and create a new account via the Xero integration to avoid paying the BILL fee?
According to Xero’s documentation: TLDR: YES The Xero integration uses BILL’s infrastructure, but it does not link to or mirror your existing standalone BILL account. You’re essentially setting up a new, embedded BILL-powered experience inside Xero. While this version does not require a standalone BILL subscription fee (you only pay per transaction), it also doesn’t grant access to features or data from your legacy BILL account. Cancelling an existing BILL subscription and switching to the Xero integration won’t preserve your vendor history or previous bill payment workflows. If your primary goal is to reduce costs and you don’t need the full standalone BILL platform, the Xero route might make sense—but it should be seen as a new, separate setup, not a continuation of an existing account. If you choose to cancel your existing Bill.com we recommend paying for a one-time backup, so you don't risk losing your historical data. |
Overall, these features mean that Xero’s bill pay integration with BILL can save you time, reduce administrative headaches, and give you greater confidence in your financial processes. Next, let’s look at exactly how this integration makes your accounts payable workflow simpler on a day-to-day basis.
If you’re managing accounts payable (the process of recording bills and paying what you owe), the Xero–BILL integration can significantly streamline your workflow. Here’s how it simplifies things for a typical small business owner:
You no longer need multiple systems to handle bills. Everything – from when a bill arrives to when it’s paid – happens in Xero. This means no more writing physical checks by hand, no manually logging into online banking for bill payments, and no exporting or importing data between software. For example, if you receive a vendor invoice, you’d enter it into Xero (or sync it in via Dext Prepare or Hubdoc). Once it’s there as a bill, that same Xero screen lets you pay it. You click “Make Payment” and complete the payment steps (we’ll see those in detail shortly). In the past, you might have entered the bill in Xero, then cut a check separately or used a third-party bill pay service and then reconciled later. Now it’s all one continuous process.
Because the payment is initiated inside Xero and automatically recorded, you eliminate double entry. There’s no need to re-key payment details into your bank’s bill pay system or a separate app. This not only saves time but also reduces the chance of typos or discrepancies. As an added benefit, having the payment details sync automatically means your reports (like cash flow and expenses) are instantly updated. According to one early user, “Once the bill is entered in Xero, it’s already reflected in the reports. There’s no need for additional syncing or troubleshooting... It’s all there, ready for review”. In other words, your accounting books and actual payments stay perfectly in sync, with minimal effort.
With everything in one place, bills are likely to get paid on time or even faster than before. Xero found that many small businesses struggle to keep track of due dates and often miss having a single place to manage payments. This integration addresses that by consolidating bill management and payment tracking. You can see at a glance in Xero which bills are “Awaiting Payment,” select them, and pay. There’s even an option to pay multiple bills in one batch, which can speed up the weekly or monthly bill routine. By paying from within Xero and leveraging BILL’s electronic payment network, your vendors can get paid quicker (for instance, via direct deposit instead of waiting for a check to arrive). And for you, quicker payments and up-to-date records mean better visibility into your cash flow – you’ll always know what’s scheduled to go out and can plan accordingly.
If you have a team or an accountant helping you, the integration supports an approval workflow. This simplifies collaboration. For example, your bookkeeper could enter and prepare bills in Xero, then use the “Request someone to pay” function for a batch of bills. You get a notification (within Xero or via email) that bills are awaiting your approval. You can then review the list in Xero and hit “Pay” to authorize the actual disbursement from your bank. This means no more back-and-forth via emails or paper signatures to approve payments. The system tracks who authorized what, adding a layer of internal control which is great even for small teams (it helps prevent unauthorized payments since one person alone can’t both create and pay without oversight if you use the approval feature).
Some businesses have used standalone accounts payable software (like the standalone BILL.com application) to manage bill payments and then synced that with Xero. While that can work, it often involves synchronization settings, duplicate contact entries, or “clearing” accounts to match the two systems. Those setups can break or require troubleshooting. With the new integrated approach, there is no syncing needed because Xero and the bill pay function are essentially one system now. As one user noted, this bypasses the need for clearing accounts and avoids the sync errors that sometimes occurred with previous integrations. In effect, it’s simpler and more foolproof.
The integration streamlines accounts payable by making bill payment a natural extension of the bookkeeping you’re already doing in Xero. You enter a bill, you pay it in Xero, and Xero takes care of updating the accounts. No duplicate work, fewer chances to forget something, and greater confidence that your records reflect reality.
Next, we’ll walk through how to set up this integration in Xero and get started with paying bills in-app.
Getting started with Xero’s in-app bill pay is straightforward. The setup mainly involves verifying your business with BILL and connecting a bank account for payments. At this stage, only the subscriber (primary owner) of the Xero organization can set up online bill payments. If you are the subscriber for your business’s Xero account, here are the basic steps to enable the integration. If you are our client, we are the subscriber and can set this up for you – just let us know!
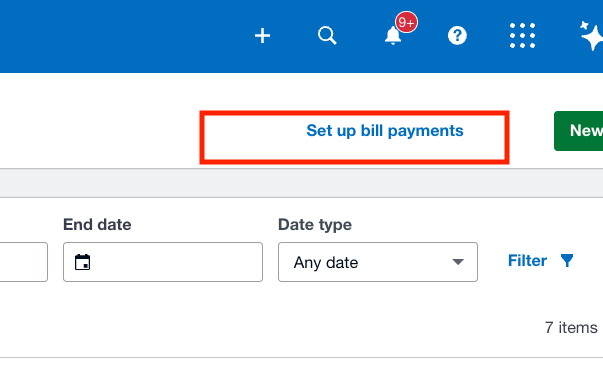
Log in to Xero and navigate to your Bills area (for example, go to the Purchases or Bills to Pay section). You should see an option to “Set up online bill payments” or a prompt within an unpaid bill to “Get started with BILL” if the feature is available on your organization. Click that to begin the setup wizard.
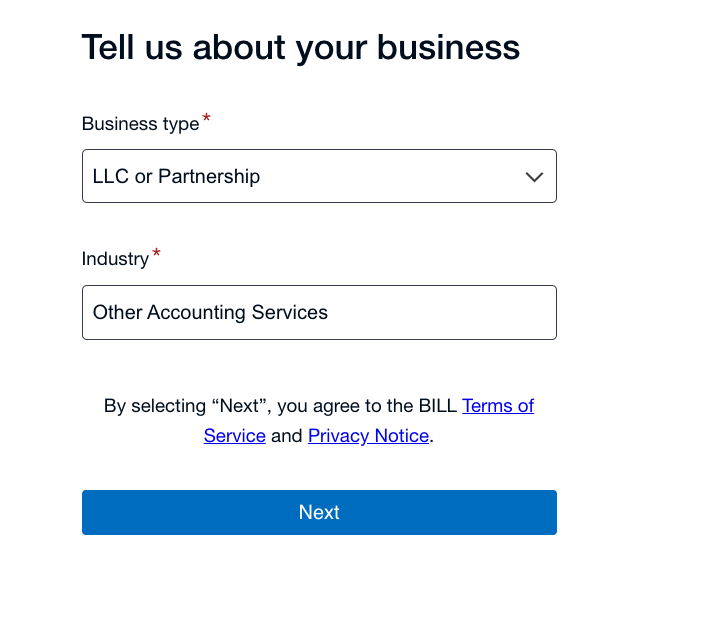
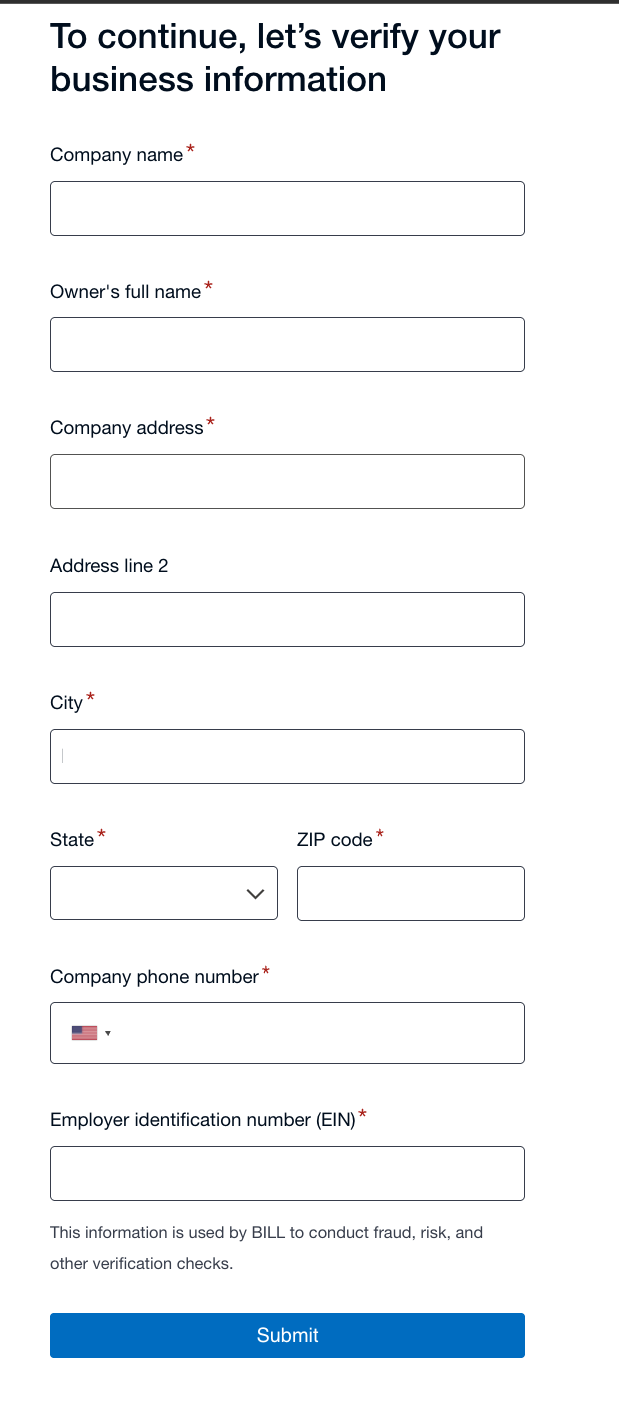
Xero will ask for information to verify your business identity, because BILL (as a payments provider) needs to comply with financial regulations. You’ll need to submit your business details for verification by BILL. This includes things like business name, address, industry, and owner information, and a “protected ID” number such as your business’s Tax ID (EIN) or your Social Security Number (for sole proprietors). Essentially, it’s gathering the same kind of details you might provide when opening a bank account. BILL uses this info to satisfy “Know Your Customer” requirements, since they are a licensed money transmitter and must verify who is using their payment platform. Tip: Be accurate and complete with the info to avoid delays. Most businesses are approved quickly (many even instantly) if the information matches public records. In some cases, BILL might email you for a bit more documentation (such as proof of address or incorporation papers) – if so, follow their instructions and note you have about 5 days to respond to any such request.
Next, you’ll connect the bank account that you want to use to fund your bill payments. This is the bank account from which money will be pulled to pay your vendors. Xero will guide you to link your bank account in Xero to BILL (the process might involve selecting an existing bank account that you’ve already set up in Xero, or adding a new one). You’ll also be asked to set up an ACH direct debit authorization on that account. This authorization allows BILL to initiate withdrawals (for bill payments and the related fees) from your bank on your behalf. Essentially, you’re giving permission for your bank to be debited when you pay bills through Xero. This is standard for any online bill pay service – similar to how you might link a bank account to PayPal or another payment provider.

Once you’ve submitted your business info and bank details, BILL will verify everything. Many times this is instantaneous or done within a few minutes. In some cases, there might be a short wait. You will receive an email confirmation when verification is successful, and within Xero, BILL will become available as a payment option. If for any reason verification fails, BILL will notify you via email with steps to appeal or provide additional info. (This is uncommon if all info is entered correctly, but it’s good to know you can follow up if needed.)
After you’re verified, the setup is complete! You can now go to your Bills to Pay screen in Xero and you’ll see “BILL” listed as a payment option when you go to pay a bill. We’ll walk through using the feature in the next section. Essentially, whenever you choose to pay a bill, you’ll get the option to use BILL (which triggers an electronic payment) or other methods like recording a manual payment or printing a check. Selecting BILL will let you proceed with an online payment through this integration.

That’s it for the initial setup. The process is a one-time thing – after this, you won’t have to re-enter business info again. Just note that if you have multiple Xero organizations, you’d need to enable it separately for each business (which makes sense, as each business has its own verification). Also, you can add more than one bank account if needed; for example, if you want the flexibility to pay from different accounts, Xero lets you connect multiple bank accounts as funding sources for payments.
Once setup is done, you’re ready to use the feature. Let’s look at how paying bills within Xero actually works with this integration.
Using the bill pay integration in Xero is designed to be intuitive. Here’s a step-by-step example of how you would use it to pay bills:
In Xero, go to your Bills (Business → Purchases → Bills to pay) and find the bills that are awaiting payment. You can tick the checkboxes next to multiple bills if you want to pay several at once. Then click the “Make Payment” button. This will start the payment process for the selected bills.
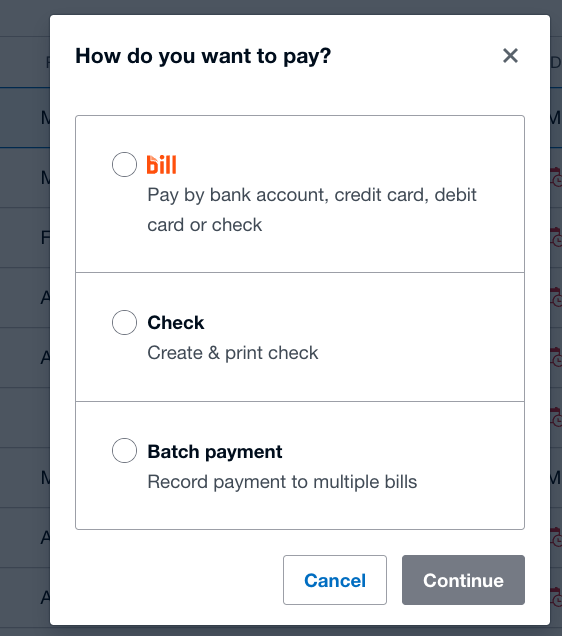
Xero will ask “How do you want to pay?”. With the integration enabled, you’ll see an option for “BILL” (alongside other options like “Check” or “Batch Payment”). Choose BILL as the payment method. (The first time, Xero might show a brief info tooltip that these payments are powered by BILL.) Selecting BILL means you intend to pay electronically through the integrated system. Then click Continue.
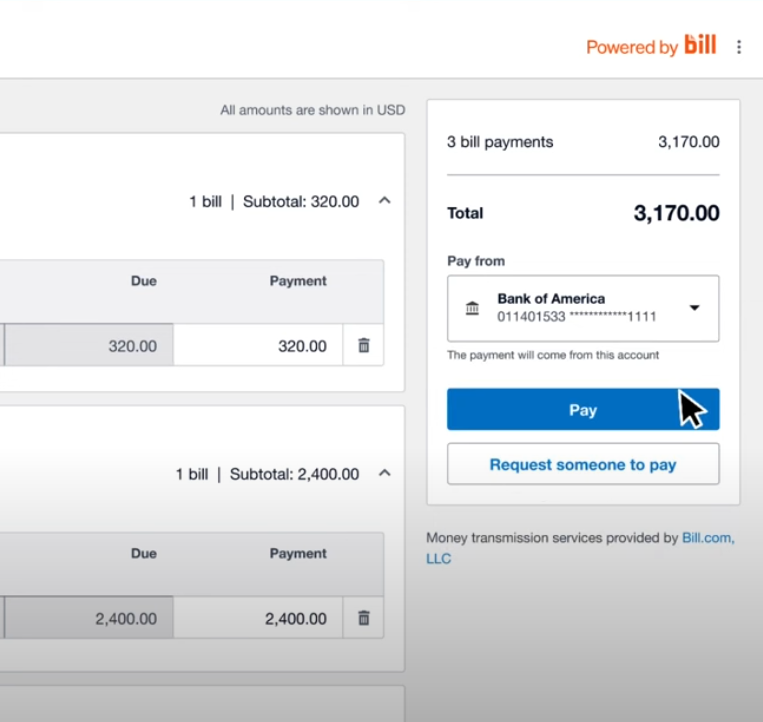
Next, you’ll see a payment summary screen showing the bills grouped by vendor. This is your chance to review the details before finalizing. For each vendor you’re paying, Xero will display the bills you selected for them, the amounts due, and how the payment will be delivered (e.g. via ACH direct deposit, or by check, etc.). If a vendor is recognized in the BILL network, it might show an indicator (and if any vendor is missing info, you may be prompted to add it – for example, if they have no address on file, you’d need to input an address to mail a check, or ideally add their bank details for ACH). You will also see the total amount to be paid for all bills combined. Choose which bank account you want to pay from (if you have more than one connected).
On this screen, you can also choose to either “Pay” now or “Request someone to pay”. If you are the one responsible for payments and you’re ready, you’d click Pay. If you want to utilize an approval workflow (say, you prepared this but need the business owner to authorize), you would click “Request someone to pay”, which triggers the approval process whereby the authorized person gets notified to approve the payment .
If you hit “Pay” and you are an authorized payer, Xero will ask you to confirm the payment. At this point, you will go through the two-step verification (2FA) process. This usually means Xero will send a code to your phone or ask you to use an authenticator app, which you then enter to confirm it’s really you. This extra step is the security measure ensuring only you (or an authorized user) can initiate the transfer of funds. After entering the verification code, you’ll confirm the payment.
Once confirmed, Xero will submit the payment through BILL’s system. You don’t have to do anything else at this point. BILL (the backend system) will pull the funds from your specified bank account and disburse them to each vendor. The timing of this can vary: ACH electronic payments typically take a day or two to clear; mailed checks might take longer due to postal delivery. Xero will show the status of each payment (e.g., scheduled, processing, completed). You can check back in the Bills section or a dedicated Bill Payments dashboard to see updates. You can track the status in real time within Xero – for example, it may show that a payment is pending or a payment has been completed on a certain date. If a payment fails for some reason (like insufficient funds or a bank issue), you would also be alerted in Xero.
After the payment is processed, each bill that was paid will be marked as Paid in Xero automatically, and the system will create the necessary payment transactions in your accounting records. If the bank account is also connected to Xero’s bank feeds, the outgoing payment will later match up for reconciliation (often automatically). Essentially, Xero handles the accounting side—you’ll see the bill marked paid and a corresponding spend money transaction for the payment, which should reconcile without you needing to manually do anything. This gives you a tidy audit trail: you can open a paid bill in Xero and see the payment details (date, method, etc.).
That’s the basic usage flow. From a user’s perspective, it feels very much like using Xero normally – just with a new option at the payment step. The design goal was to keep it simple: if you know how to enter bills in Xero, you only have a couple of extra clicks to also pay those bills.
A few additional notes on using the feature:
Vendor Setup: To make things smooth, it’s best to have your suppliers (vendors) set up in Xero with their details. In particular, if you can get your vendor’s bank account info and add it to their contact record in Xero, then payments to that vendor can go via direct deposit (ACH) easily. If you don’t have their bank details, you should at least have a current mailing address so that a check can be sent. Xero recommends adding vendors as Contacts in advance with whatever payment info you have, to avoid interruption during the payment flow. If a vendor is already in BILL’s network, Xero may recognize them and handle payment via the network automatically, which could mean the vendor gets an electronic payment even if you didn’t personally enter their bank details (because they might have provided it through BILL’s network on their side).
Payment Limits: Currently, you cannot schedule a payment for a future date within this integration (scheduled payments are planned to launch later). When you initiate a pay now, it goes into process immediately. Also, you cannot combine multiple bills into one single payment per vendor (yet) – each bill you pay will result in its own payment transaction (or if you pay two bills to the same vendor in one batch, they might still get two separate deposits or checks). These are early limitations to be aware of; Xero has noted that the ability to schedule payments and perhaps consolidate payments is on the roadmap for later updates in 2025.
Daily Limits: The integration itself doesn’t impose specific dollar limits beyond what your bank might restrict. However, remember that your bank may have daily ACH transfer limits. If you plan to pay a very large total amount in one go, make sure it doesn’t exceed your bank’s limit or else some payments might not go through. This is similar to any large payment from your bank – just something to keep in mind (you can check with your bank on transfer limits).
Now that we’ve covered how to set things up and use it, let’s consider some limitations and important considerations of this new feature.
While Xero’s BILL-powered bill payments are a big step forward, there are a few limitations and conditions to be aware of:
This feature is only available for Xero organizations based in the United States, paying in U.S. dollars. You cannot use it to pay foreign currency bills or to pay vendors outside the U.S. at this time. If you have multi-currency turned on in Xero and have bills in, say, Euros or Canadian dollars, those bills cannot be paid via the BILL integration (you’d handle those separately). So this is very much a U.S.-focused service as of launch. Xero may expand to other regions in the future, but currently if your Xero region is not USA, you won’t see this feature.
As noted, even within a U.S. organization, all payments via this integration occur in USD. You can’t instruct it to send a different currency. All amounts are processed in U.S. dollars, and Xero even displays a note “All amounts are shown in USD” in the bill payment screens to remind you of that. No foreign exchange or multi-currency handling is part of the feature yet.
Initially, you can only fund payments from a bank account (ACH pull). The interface mentions credit/debit card as an option, but that capability is not live at launch – Xero has indicated that “Pay by card” is planned to launch later this year. So, at present, you cannot pay your vendors with a credit card through this integration. If you see references to card options, know that it’s a future enhancement. For now, make sure you have a sufficient bank balance because the payments will come directly from your bank account.
As mentioned earlier, only the subscriber can do the initial setup. This means if you are an accountant managing Xero for a client, you’ll need the subscriber (usually the business owner) to go through the verification steps, or to temporarily give you subscriber access to do it. After setup, other users (with appropriate permissions) can enter bills and even initiate the “request to pay,” but the actual payment authorization will still require the assigned approver (often the subscriber) to complete.
You cannot schedule a bill to be paid on a future date at this time. Every payment is initiated when you go through the process and generally will be processed as soon as possible. So if you prefer to set up payments in advance (like “pay this bill on the 30th of the month”), that functionality isn’t available in-app. You’d need to come back and pay it closer to the date due. The good news is Xero is planning to add scheduled payments in the future, which will make it more convenient to plan ahead. Keep an eye out for updates from Xero on this feature.
The integration processes payments per bill in full. If you needed to make a partial payment on a bill (perhaps you’re paying half now, half later), you would likely have to split that bill into two in Xero or not use the integration for the partial payment (since the typical use case is paying the entire bill amount). The interface doesn’t explicitly provide a partial payment option during the flow – it assumes the full amount due is being paid.
Most typical vendors (businesses with a U.S. bank account or mailing address) can be paid through this system. If you have an unusual situation, such as needing to pay an individual who doesn’t have a bank account or a vendor with only international banking, those would fall outside the scope. Additionally, if a vendor’s address is incorrect or missing, the check payments could be delayed – so it’s on you to ensure vendor details are accurate. Also note that if a vendor prefers being paid by credit card or services like PayPal, at present the integration doesn’t do that; it’s ACH or check or BILL network methods only.
If you use Xero for multiple businesses, you have to set up each one separately with BILL. Also, there’s no concept of a global dashboard across organizations for bill payments – you have to manage within each org (which is how Xero generally works, but it’s worth noting if you’re an advisor with many clients, you need to switch into each client’s org to handle their bills, you can’t do them all in one view).
Despite these limitations, the feature covers the majority of common scenarios for U.S. small businesses. For most users – paying domestic bills in USD from their bank – these constraints won’t feel too restrictive. Just be mindful of the currency and region restriction and the fact that you can’t schedule payments as of now.
Now, let’s discuss the payment options and how vendor preferences are handled, as that’s a key part of how this integration works under the hood.
One of the strengths of the Xero–BILL integration is that it offers flexibility in how payments are delivered to your vendors, while keeping things simple on your end. Here’s what you need to know about the funding options and vendor disbursement methods:
At launch, the funding source for all payments is your bank account. During setup, you link a bank account, and that’s what will be used to pull money for bill payments. In practice, this is an ACH withdrawal from your account facilitated by BILL. You can link multiple bank accounts if needed and choose which one to use for a given payment batch. The ability to pay using a credit card or debit card through this integration is expected later, but right now you’ll need a bank account (checking account usually) for payments. Using a bank account is generally cost-effective (ACH fees are low, as we’ll discuss in the pricing section) and is similar to how you might pay bills via your bank’s online bill pay.
The method by which your vendor gets the money can vary, and BILL’s system will determine the best way based on the info available and the vendor’s preferences. Here are the common scenarios:
If you have your vendor’s bank account details on file in Xero, then the payment will be sent electronically to their bank via ACH. This is fast and the preferred method for most because it goes directly into the vendor’s account.
If you do not have bank details but have a mailing address for the vendor, BILL will automatically print and mail a paper check to the vendor’s address. The integration takes care of check printing and postage – you don’t have to write the check yourself. Do note that mailed checks take longer (they have to go through the postal system), so the delivery date will be a few days out. Xero will give an estimated delivery date for check payments on the review screen so you know roughly when the vendor should receive it (for example, it might show an estimated delivery date a week from now, depending on mailing).
If your vendor is a member of the BILL network (meaning they’ve used BILL on their side and are in that 7 million strong network), the payment might be delivered via the network. Vendors in the network can choose to receive funds through various electronic methods – common ones include ACH (to their bank) or RPPS (a bank-to-bank payment service), virtual card payments, or even to a digital wallet. The good thing is, as a Xero user, you don’t have to manage these details. You simply pay, and if the vendor has set a preference in BILL (for example, some vendors may opt to get paid by virtual card because of how their accounts receivable is set up), the system will send it that way. In Xero, it will just show that an “electronic payment” was made. Essentially, the vendor’s preference on the BILL side will dictate the actual channel. This is quite advanced, but it all happens behind the scenes. For you, any of those methods count as an “ePayment” (electronic payment), which typically carry the lower transaction fee compared to a paper check.
Regardless of whether the vendor gets an ACH or a check or some other digital method, Xero will mark the bill as paid with a reference. If it was a check, Xero might show a check number (BILL assigns it). If ACH, it might just show an ID. But all of them will appear as an “online bill payment” record in Xero, so you know it was done through this integration and not a manually entered payment.
Once credit card payments are enabled (planned for later in 2025), you as a business could choose to fund certain payments with a credit card. That might be useful if you want to, say, earn card rewards or delay cash impact by using your card’s billing cycle. In that scenario, presumably, if a vendor can accept card, BILL would pay them via a card transaction; if not, BILL might charge your card and still send a check/ACH to the vendor. Those details will become clearer once launched. For now, just keep in mind that more options are on the horizon, adding to flexibility.
The integration is flexible on the vendor side but simple on your side. You just choose “pay with BILL,” and the system figures out if it should do an electronic deposit or send a check, based on what info is available for that vendor. You don’t have to worry about signing checks or managing different payment platforms for each vendor – Xero and BILL take care of it. This means you can cater to vendors who are tech-savvy (they’ll get an ACH) and those who are old-school (they’ll get a paper check) in one fell swoop.
One thing to note: Because the vendor’s chosen disbursement method can change, the fee you pay per bill (if it changes from ACH to check) could also change (more on fees next). But the differences are small. Let’s talk about the costs involved in using this integration.
Whenever money is moving, security is a top concern – and rightly so. Xero’s bill pay integration includes multiple security features to protect your business, as well as approval workflows to ensure control over payments:
As mentioned earlier, Xero requires two-step verification when sending payments. This means even if someone has access to your Xero account, they cannot initiate a payment without that second factor (typically a code from your mobile device). It greatly reduces the risk of unauthorized payments. If you haven’t already, you’ll need to set up two-step authentication on your Xero account as part of enabling bill payments. This usually involves using an authenticator app or SMS codes. It’s an extra few seconds during payment, but it significantly hardens security – much like how your bank verifies important transactions.
Xero allows you to control who in your organization can prepare bills and who can approve/pay them. The “Request someone to pay” function we described is essentially an approval workflow. You might configure, for example, that only the business owner role (or an admin) can authorize the actual payment, while a bookkeeper role can only prepare the payment. This division of duties is a classic internal control to prevent fraud or mistakes. In a small business context, maybe you, the owner, want to be the only one who can hit the final “pay” button – the system supports that by letting others do the prep and you do the approval. All these actions are tracked in Xero’s history, so there’s an audit trail of who submitted a payment and who approved it.
When you enter sensitive information (like bank account numbers or tax IDs) during setup, that data is handled securely. BILL, as the underlying service provider, is a reputable platform trusted by nearly 500,000 businesses and used by major banks and accounting firms. They employ bank-grade security practices – your data is encrypted, and their systems are monitored to guard against breaches. Neither Xero nor BILL will display full bank account numbers or sensitive personal info once it’s submitted; it’s tokenized and kept behind the scenes.
BILL is a licensed money transmitter in the U.S., which means it adheres to strict regulatory standards (such as Anti-Money Laundering rules and state-by-state licensing). Part of why they verify your identity during setup is to comply with these laws and also to protect against fraudulent use of the platform. On the payment side, BILL has robust fraud detection mechanisms. For instance, they might flag unusual payment requests or verify changes in vendor banking details to prevent scams. While you as a user might not see these processes, it’s comforting to know that the payments are being processed by a regulated, secure system rather than a fly-by-night service.
If you add a vendor’s bank details, there may be micro-deposit verifications or other methods to ensure the account is valid. And if your vendor is part of the BILL network, they have likely gone through verification on their side too. This network aspect means when you connect with a vendor via BILL, there’s some trust that the vendor is legitimate. It helps reduce the chance of paying the wrong person or falling for a billing scam, because BILL’s network links real businesses.
Both Xero and BILL will send email notifications for critical events (for example, confirmation of your setup, notification 10 days before any monthly fee debit, payment confirmation emails, etc.). These notifications act as a security net – if someone did try something odd on your account, you’d likely get an email about a payment being set up or a bank authorization being added. Always pay attention to emails from Xero/BILL regarding bill payments.
In case of mistakes or issues, there are ways to void or cancel payments (within a limited time window). If you realize you paid the wrong vendor or amount, you can contact Xero/BILL support to attempt to stop a payment. While not exactly a feature, it’s part of the risk mitigation that not all hope is lost if an error happens – though timing is critical in such cases.
From a small business owner’s perspective (especially a non-accountant audience), the takeaway is: the integration is safe and designed with controls in place. You’re not sending money out blindly; you have to confirm everything with extra authentication, and you can set up who is allowed to do what in the system. The fact that BILL is an established player in the payments space adds to the confidence – they bring enterprise-level security to this small biz solution. So you can adopt this new way of paying bills without worrying that it’s any less secure than doing it the old way (in fact, it’s likely more secure than writing paper checks, which can get lost or misused).
A big question when adopting any new solution is: How much does it cost? The good news is that there’s no additional monthly fee for using Xero’s online bill payments beyond your existing Xero subscription. You only pay per transaction (per bill paid) after an initial free period. Here are the details on pricing and fees:
Xero is running a promotion where for the first 30 days of using online bill payments, you pay no transaction fees at all. This 30-day clock starts when you successfully onboard to BILL (i.e., complete the setup and verification). For example, if you set up the integration on April 15, 2025, you won’t be charged any payment fees for any bills you pay through Xero until May 15, 2025. This is a great way to try out the feature and process as many bill payments as you want in that period at no cost.
Note: This limited-time offer is available to new users who enable the feature by May 30, 2025, per Xero’s terms. If you’re reading this while the promotion is active, you might want to take advantage of it soon. If it’s after that date, check Xero’s website to see if any new promotions are available.
Once the free period ends (or for payments made after the promotional cutoff date), Xero will charge a fee per bill paid using the BILL integration. These fees are in addition to your normal Xero subscription. The fee amounts depend on the payment method:
For payments that go out electronically (ACH direct deposit to the vendor, or other electronic methods through the network), the fee is very low – typically $0.49 per bill paid. This is a small flat fee for processing an ACH, which is quite reasonable given the time it saves and the cost of, say, mailing a check yourself.
For payments that result in a paper check being mailed, the fee is a bit higher to cover the printing and mailing – usually $1.69 per bill paid by check. This makes sense: it covers the stamp, envelope, and processing. Even $1.69 is likely less than the cost of your time to write a check and mail it, not to mention the materials, so many businesses find this acceptable for the convenience.
When credit card funding becomes available, expect a different fee structure for those, likely a percentage of the transaction (because credit card transactions incur interchange fees). Xero hasn’t published those yet, but typically bill payment services might charge around 2.9% for credit card funded payments. We’ll skip the details since it’s not live yet, but be aware card payments won’t be free; they’ll carry a processing fee if you choose to use that method once available.
If you pay 10 bills in a month electronically, and all go via ACH, the total fee would be 10 × $0.49 = $4.90 for that month. If some of those ended up as checks, say 2 were checks and 8 were ACH, the fee would be 2 × $1.69 + 8 × $0.49 = $3.38 + $3.92 = $7.30. These fees are charged by Xero via BILL after the fact. They accumulate and are typically billed monthly. Xero/BILL will send you an email 10 days before debiting your bank account for the fees, and then auto-debit the fees from the bank account you authorized for fees (which is usually the same account used for payments). You can view the fees in Xero as well (there’s a statement in the Bills section that shows what fees have been incurred).
Unlike using BILL as a standalone service (which normally has its own subscription cost), using this embedded solution means you don’t have a separate subscription fee for bill pay. You continue paying for your Xero plan (Early, Growing, or Established, etc.) and that’s it – no add-on charge for enabling the feature. This is a significant cost advantage because small businesses can enjoy the benefits of an accounts payable automation platform without the typical monthly price tag that such platforms might charge. Basically, you pay only when you actually make payments (post-trial).
There’s no charge per user or anything. You can have multiple people in Xero involved in the bill payment workflow (preparing or approving) and Xero doesn’t charge extra for that. All user access is covered by your Xero subscription as usual. So if you invite your accountant or a staff member into Xero to help with bills, that collaboration aspect doesn’t incur extra fees.
The fees mentioned ($0.49, $1.69) are current as of 2025 and were part of the launch information. Xero’s terms do note that fees are subject to change in the future. Any changes would be communicated, but small adjustments could happen over time. Always refer to Xero’s official “fees for online bill payments” page for the latest pricing .
One interesting aspect is that Xero might not always show the exact fee at the moment of initiating payment if the vendor’s method could change. For instance, if you schedule a payment and at that time the vendor is set to receive ACH ($0.49 fee), Xero will likely show $0.49. But if the vendor later changes their preference in the BILL network to receive a check, the final fee would be $1.69. These cases are rare and usually you as the payer wouldn’t be surprised by it (since a vendor typically won’t switch from ACH to check as that would slow their payment). But just know the fee is ultimately determined after the payment is processed, aligning with how the vendor was paid. The differences are small in absolute terms, so it shouldn’t materially affect your costs, but transparency is important.
In the first 30 days free period, Xero will still show you what the fee would have been on each payment (so you understand the pricing), but they will waive those fees during that time. After the period, the fees will start getting charged.
Overall, the pricing model is pay-as-you-go. For many small businesses, the actual dollars spent on fees will be quite low relative to the time saved. Think of it this way: if it costs you $0.49 to pay a bill and mark it reconciled, that’s probably worth the several minutes it would take to do it manually. Plus, late fees from missing a payment or errors from manual entry could cost far more. During the first month, you can freely experiment without incurring fees. After that, you can decide if the convenience is worth the cost on a per-bill basis (and we suspect you’ll find that it is, given the modest fees).
To understand the practical impact, let’s consider a few common scenarios where Xero’s in-app bill pay integration makes life easier:
Imagine you run a small retail store. Each month you have to pay rent to your landlord, utility bills for electricity and internet, and invoices to a couple of suppliers who provide your merchandise. In the past, you might write a rent check, log into two different utility websites to pay those bills, and maybe use online banking to send a payment to suppliers. With Xero’s integrated bill pay, you instead enter all these bills into Xero as they come in, and when it’s time to pay, you simply go down your “Bills to Pay” list in Xero, tick off rent, utilities, and supplier invoices, and pay them all in one batch. Xero will send an ACH deposit to your landlord (because you added your landlord’s bank info once and now it’s reused), it will pay the utility companies electronically via the BILL network (they were recognized as common billers), and it will mail a check to the small supplier who hasn’t gone digital yet. You do all that in a few minutes, and you can see right in Xero that those payments are scheduled or completed. The result: no more juggling four different payment methods – you saved time and all your payment records are neatly stored in Xero. You also reduce the risk of missing a payment, because Xero’s dashboard shows you what’s due and you can handle it then and there.
Consider a small consulting firm where the owner is very busy with client work, and there’s a part-time bookkeeper who comes in weekly. The bookkeeper’s job is to organize bills and get them ready for payment, but the owner wants to be the one to actually approve any money leaving the account. With this integration, the bookkeeper can log into Xero, enter all the bills, and then go to the Bills list, select them, and choose “Make Payment” → “BILL” → “Request someone to pay.” The owner gets a notification (and sees in Xero) that a batch of, say, 5 bills totaling $3,000 is awaiting approval. The owner can quickly review those bills in Xero (ensuring they’re legitimate expenses) and then approve and send the payments with a couple of clicks and a 2FA code. The result: The bookkeeper doesn’t need access to the bank account or a separate payment system – they stay within Xero’s permissions. The owner maintains control but with minimal effort. All the while, Xero keeps a record that the bookkeeper prepared the payment and the owner authorized it. This streamlines the workflow and improves accountability.
Picture a startup founder who is often traveling or out meeting clients. Invoices and bills come in via email and get loaded into Xero. With Xero’s mobile app (or via a laptop on the go), the founder can view the bills and pay them through the integration. Perhaps they get an email alert from Xero: “You have bills due in 3 days.” They open the Xero app, review, and approve payments right from their phone (Xero’s mobile experience supports a lot of functionality and likely supports the bill pay or at least they can log in via browser on mobile to do it). The result: Even while traveling, bills are paid on time through Xero, without needing to carry checkbooks or worry about missing due dates. Cash flow stays managed and the business avoids late fees.
Now think from an accountant or bookkeeper’s perspective. Suppose you manage finances for several small business clients, all of whom use Xero. Traditionally, for each client you might have to log into their Xero to get the bill info, then log into their separate bill pay system or cut checks from their checkbook (some accountants literally get check signing authority or prepare checks for clients to sign). With the Xero–BILL integration, you can do almost everything in Xero itself. For each client (Xero org) you can set up the online bill payments (with the client’s permission and bank details). Then, on a weekly basis, you go into each client’s Xero, prepare the payments, and use the “request approval” if the client wants to approve, or if you have authorization, you can even schedule and send payments directly. Example: You handle a nonprofit’s bills: you enter them, request the director’s approval through Xero; she approves from her office; payments go out. For another client, a busy doctor, you might have standing permission to pay routine bills under $500 – you pay those directly and maybe only ask approval for larger ones. Xero records everything, so come month-end, when you do the bank reconciliation, everything matches up easily. The result: You as the accountant saved a ton of time by not dealing with multiple systems, and your clients appreciate that their bills are taken care of efficiently. You might even impress them by saying “it’s all handled through our accounting system with proper controls,” which elevates your service.
Let’s use the real example that Xero provided: Dan Quigley, an accountant who also runs a side business (a touring music band). Dan used to use an external accounts payable software synced with Xero to pay the band’s bills. That meant dealing with sync issues occasionally. After switching to Xero’s embedded bill pay, Dan can do everything in one place. For his band, he needs to pay vendors like merchandise suppliers and the band manager’s commissions. Now, when he enters those bills in Xero, he pays them via Xero’s BILL integration. He found that “once the bill is entered in Xero, it’s already reflected in the reports… There’s no need for additional syncing… it cuts down on time and reduces inaccuracies. Our vendors... are now getting paid quicker.” . The result: Dan spends less time on admin for his side hustle and more time focusing on the business (making music!). Even though Dan is tech-savvy (his nickname is “the app guy”), he values that this solution removed extra steps and potential tech hiccups. If someone like Dan sees the efficiency gains, a non-accountant small business owner will likely find it straightforward and time-saving as well.
These examples highlight that whether you’re a sole proprietor paying a handful of bills or a growing business handling dozens of payments, the integration scales to help. It’s useful for those who pay bills themselves and those who have bookkeepers or accountants assisting. The common theme is streamlining the payable process and keeping everything tidy in one system.
Ready to explore Xero’s in-app bill pay integration further or get started with it? Here are some helpful resources and links to official Xero and BILL information to guide you:
Xero Online Bill Payments – Setup Guide: Check out Xero’s official support article on how to set up online bill payments in Xero. This step-by-step guide walks you through verifying your business with BILL and connecting your bank account. You can find it on Xero Central (their help center). This resource provides detailed instructions and screenshots for the setup process.
Xero Bill Payments FAQs: Xero has a comprehensive FAQ page that answers common questions about the integration. If you’re wondering about eligibility, specific capabilities, or troubleshooting, the FAQs are a great place to look. This includes sections on overview, pricing, setup, using the feature, security, and more. For example, it clarifies that bill pay is US-only and USD-only for now, and it explains what to do if verification requires additional info.
Pricing and Fees Details: For a clear breakdown of the fees associated with online bill payments (and the terms of the 30-day free offer), see Xero’s official pricing page for this feature. This page lists the per-transaction fees (ACH vs check) and explains how and when fees are charged. It also reiterates the promotion terms (valid until May 30, 2025 for the 30-day free period).
Xero Blog Announcement: For a narrative on the launch of this feature and its benefits, you can read Xero’s blog post titled “Introducing US online bill payments, powered by BILL.” This blog post provides context on why Xero built this integration, lists the key features in a concise way, and includes the testimonial from Dan Quigley in story form. It’s a good overview if you want to understand the vision behind the feature.
BILL’s Xero Integration Page: BILL also has information on integrating with Xero. Keep in mind, BILL has long had a Xero integration (for its standalone app), but now that it’s embedded in Xero, most info is on Xero’s site. Still, you can see BILL’s perspective on how it streamlines payments. This might highlight benefits like getting paid faster and reducing manual work, from the BILL marketing standpoint.
Customer Story – Dan Quigley (MATAX): If you enjoyed Dan’s insights, Xero has a full customer story on him and how he uses technology like this feature in his accounting practiceThis story dives into Dan’s background and his experience with the online bill payments feature, providing a richer narrative of the benefits (like focusing more on advising clients rather than processing data).
With these resources, you should feel equipped to get started. A good approach is: log in to Xero and try enabling online bill payments for one or two bills as a test (during the free period especially). You’ll quickly get a feel for how it works. Make sure to inform anyone else on your team about the new process (especially if they usually handle bills), so they know to use the BILL option when paying.
Xero’s in-app bill pay integration with BILL is a powerful new tool for small businesses to streamline their bill-paying process. It brings together the best of both worlds: Xero’s easy-to-use accounting software and BILL’s robust payment network and capabilities. By using this feature, you can save time, reduce errors, improve your cash flow oversight, and ultimately focus more on your business and less on the back-office tasks. Give it a try and see how it transforms your accounts payable workflow into something far more manageable and efficient.
Happy billing, and here’s to never juggling multiple bill pay apps again!

1 min read
For small businesses, accounting software is a must-have for managing financial data efficiently. In this blog post, we will delve into the details...

1 min read
Every superhero needs a sidekick. Batman has Robin. Sherlock has Watson. And for law firms looking to streamline their financial management, the...
1 min read
Xero’s recent acquisition of Syft Analytics marks a significant step forward in empowering small businesses with advanced financial insights. By...